
Test Android App Under Low Memory Conditions

All mobile devices have limited storage options. Therefore, it is imperative for a tester to test an app under low memory conditions. To simulate these conditions, a tester has to fill device memory using dummy files. This is very tedious and time consuming process. Well, hang on! There’s an app for that. Fill Device Memory lets you test Android app by simulating low memory conditions.
It fills your Android device internal storage and external memory/SD card in an automated method. All created files (plain text) are stored under application designated folder and will not mess up your internal or external storage. And the best part, no rooting required. Check out its screenshot below.

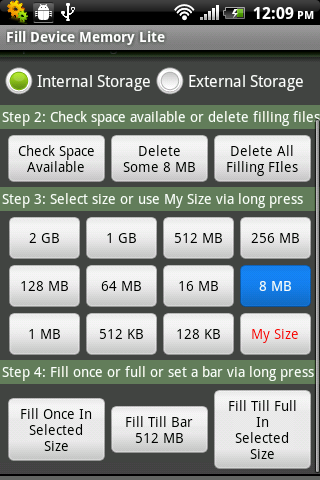
Start copying files in memory using any of the options shown in above screenshot. It copies all files in memory under ‘Fill_Device_Memory’ folder. You can check the storage space in Android device in Settings–>Storage location after copying is done. It supports 2 GB of maximum single file size.
Once done with the testing, it deletes all files created earlier to free up memory. It also allows users to set their own size. Apart from these, below are some important features of this app.
  • 11 preset file sizes to select from
  • Support fill memory until full
  • Or fill memory to a bar set by you via long press “Fill Till Bar”
  • Dynamically update the current available space
  • You can interrupt the fill progress at any time and keep the filled memory
A nice app to help you test Android app under low memory conditions. You should be able run this app in Android version 2.2 and onwards. Give it a try and let us know if you find this app useful in your mobile testing activities.

Comments

Popular posts from this blog

SSO with SAML login scenario in JMeter

SAML(Security Assertion Markup Language) is increasingly being used to perform single sign-on(SSO) operations. As WikiPedia puts it, SAML is an XML-based open standard data format for exchanging authentication and authorization data between parties, in particular, between an identity provider and a service provider. With the rise in use of SAML in web applications, we may need to handle this in JMeter. This step-by-step tutorial shows SAML JMeter scenario to perform login operation. First request from JMeter is a GET request to fetch Login page. We need to fetch two values ‘SAMLRequest’ and ‘RelayState’ from the Login page response data. We can do this by using  Regular Expression Extractor . These two values need to be sent in POST request to service provider. Refer below image to see how to do this. We will get an HTML login page as a response to the request sent in 1st step. We need to fetch values of some hidden elements to pass it in the next request. We can do this b

Reading data from text file in SoapUI using groovy script

How to read data from text file in SoapUI. SoapUI Pro has some advance feature which is not in SaopUI as data fetching from external sources so in SoapUI we use Groovy script for that. Following are the peace of groovy script code for reading data from text file. 1. Reading all data from text file. //reading all txt file at once File file = new File("E://TestData.txt") fileContent = file.getText()                  log.info fileContent 2. Reading data line by line from text file. //reading text line by line File file1 = new File(" E://TestData.txt ") List textLine = file1.readLines() log.info textLine 3. Reading data randomly of any line from text file. //reading text randon line number File file2 = new File(" E://TestData.txt ") List textLine2 = file2.readLines() rowIndex  =  Math.abs(new Random().nextInt() % 4 + 1) log.info textLine2[rowIndex]

VBScript Code - Function to convert CSV file into excel and viceversa in QTP using VBScript

We at times are required to convert excel files into csv to read as flat files and sometime require to convert a csv file into excel file to use excel features on the data.   Below function shows how to convert an csv file into excel file and vice versa. We can also convert to other formats based on constants Here constant value 23 is used to create a csv file and constant -4143 to save a file as xls file. Once the destination file is created, we can delete the source file as shown below.  In case of any issue in understanding the code, please add in comment section Call func_ConversionCSVExcel("E:\Test.csv", "E:\Test_converted.xls", "csvtoexcel") Public Function func_ConversionCSVExcel(strSrcFile, strDestFile, Conversion) on error resume next Set objExcel = CreateObject("Excel.application") set objExcelBook = objExcel.Workbooks.Open(strSrcFile) objExcel.application.visible=false objExcel.application.displayalerts=