
A Tutorial to Send Email using JMeter

Sending email is a mundane activity in any professional’s life. It’s a common medium for communication nowadays. Therefore performance testing of email server is not only important but necessary for an organization. JMeter can be helpful to perform load testing in such scenarios. In this tutorial, we will see how JMeter can be used to send email.
We will use SMTP Sampler of JMeter to send an email. JavaMail API is needed to enable email functionality in JMeter. Download it from here and paste the jar in JMeter’s lib folder. Now, perform below steps to configure SMTP Sampler.
  • Add a new Thread Group under Test Plan.
  • Right click on Thread Group and select Add–>Sampler–>SMTP Sampler. We need to populate SMTP server’s details in this sampler.
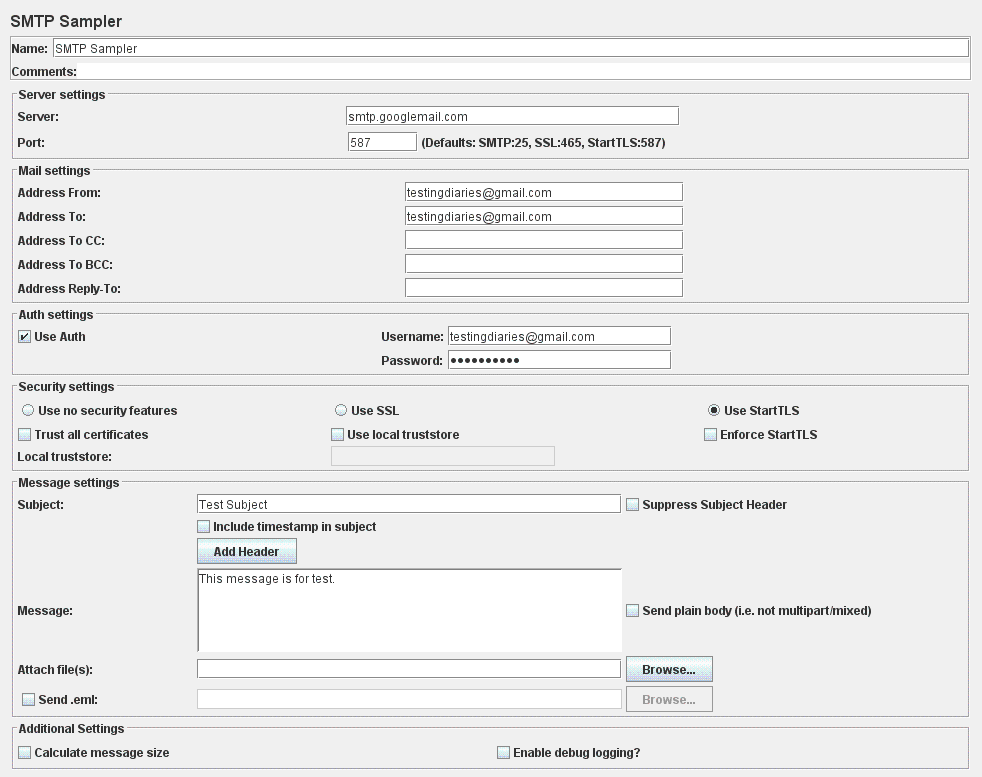
  • We will use GMail for sending an email. For this, enter these values in SMTP Sampler fields. Server: smtp.googlemail.com, Port: 587.
  • Provide values in Email Address From and To fields of Mail Settings section to specify sender and recipient.
  • Check ‘Use Auth’ checkbox and provide authentication details.
  • Select ‘Use StartTLS’ option as GMail’s SMTP server requires that security setting.
  • Provide values for email Subject and Content in Message Settings section. You can also attach an attachment from there.
  • After performing all above steps, your SMTP Sampler should be displayed as below image.

  • Run your test!
After performing above steps you should be able to send email using JMeter. Oh and in case you want to know how we can receive a mail using JMeter, read it here. We hope the above examples does a good job to explain you the JMeter mail sending. In case you are stuck at some point or you know any better way to handle emails in JMeter, do let us know about it in comments.

Comments

Popular posts from this blog

SSO with SAML login scenario in JMeter

SAML(Security Assertion Markup Language) is increasingly being used to perform single sign-on(SSO) operations. As WikiPedia puts it, SAML is an XML-based open standard data format for exchanging authentication and authorization data between parties, in particular, between an identity provider and a service provider. With the rise in use of SAML in web applications, we may need to handle this in JMeter. This step-by-step tutorial shows SAML JMeter scenario to perform login operation. First request from JMeter is a GET request to fetch Login page. We need to fetch two values ‘SAMLRequest’ and ‘RelayState’ from the Login page response data. We can do this by using  Regular Expression Extractor . These two values need to be sent in POST request to service provider. Refer below image to see how to do this. We will get an HTML login page as a response to the request sent in 1st step. We need to fetch values of some hidden elements to pass it in the next request. We can do this b

Reading data from text file in SoapUI using groovy script

How to read data from text file in SoapUI. SoapUI Pro has some advance feature which is not in SaopUI as data fetching from external sources so in SoapUI we use Groovy script for that. Following are the peace of groovy script code for reading data from text file. 1. Reading all data from text file. //reading all txt file at once File file = new File("E://TestData.txt") fileContent = file.getText()                  log.info fileContent 2. Reading data line by line from text file. //reading text line by line File file1 = new File(" E://TestData.txt ") List textLine = file1.readLines() log.info textLine 3. Reading data randomly of any line from text file. //reading text randon line number File file2 = new File(" E://TestData.txt ") List textLine2 = file2.readLines() rowIndex  =  Math.abs(new Random().nextInt() % 4 + 1) log.info textLine2[rowIndex]

VBScript Code - Function to convert CSV file into excel and viceversa in QTP using VBScript

We at times are required to convert excel files into csv to read as flat files and sometime require to convert a csv file into excel file to use excel features on the data.   Below function shows how to convert an csv file into excel file and vice versa. We can also convert to other formats based on constants Here constant value 23 is used to create a csv file and constant -4143 to save a file as xls file. Once the destination file is created, we can delete the source file as shown below.  In case of any issue in understanding the code, please add in comment section Call func_ConversionCSVExcel("E:\Test.csv", "E:\Test_converted.xls", "csvtoexcel") Public Function func_ConversionCSVExcel(strSrcFile, strDestFile, Conversion) on error resume next Set objExcel = CreateObject("Excel.application") set objExcelBook = objExcel.Workbooks.Open(strSrcFile) objExcel.application.visible=false objExcel.application.displayalerts=