
JMeter with Jenkins: Performance Testing in CI Environment

Integrating JMeter with Jenkins has various advantages. It runs performance tests automatically for every new build. It also generates various performance metrics which can be used to track performance trend over time. And it is relatively simple to integrate JMeter with Jenkins, as we will see in this tutorial.
We will have Jenkins build trigger a Maven file, which in turn will trigger our performance test. At the end of a test, relevant performance metrics can be derived from generated report. Now, let’s start configuring our setup without further ado.

JMeter with Jenkins Setup:

  • Start Jenkins.
  • Navigate to Manage Jenkins–>Manage Plugins page.
  • Select Available tab and search for ‘Performance plugin’.
  • Install the plugin and restart Jenkins.
  • As we will be using GitHub for this setup, please install GitHub plugin as well.
  • Once plugin installation is done, we need to create a new Job in Jenkins. For that, go to Jenkins Dashboard and select New Item option.
  • Provide Item Name, select ‘Freestyle project’ and click OK.
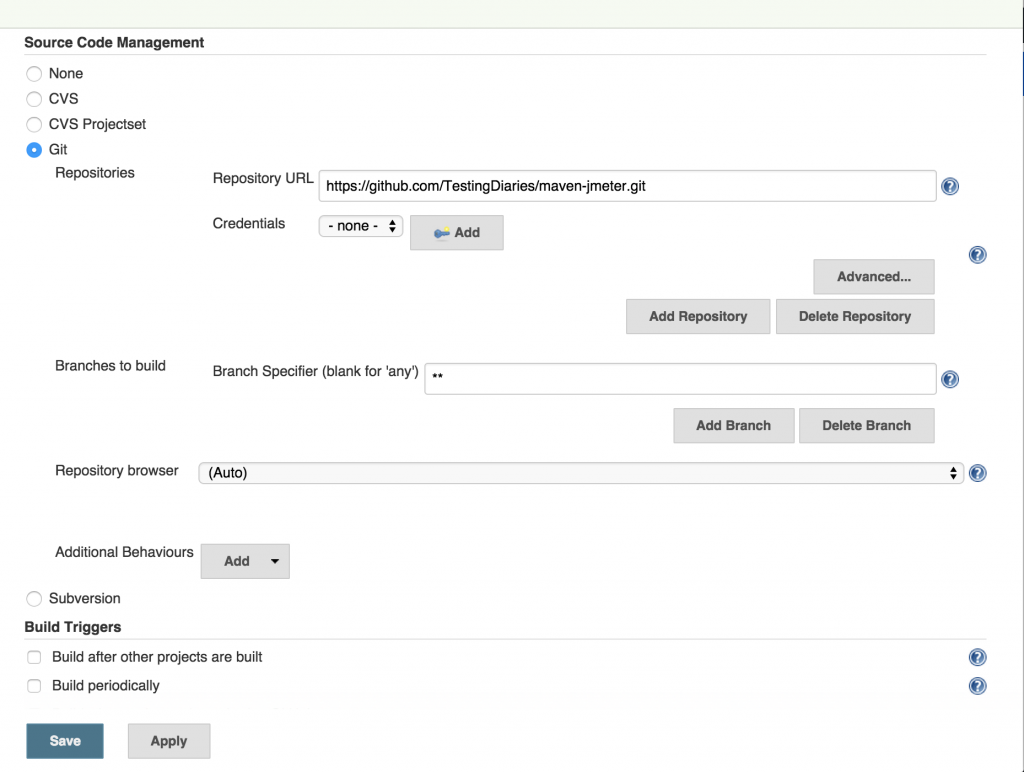
  • Select Git under ‘Source Code Management’ section.
  • Provide ‘Repository URL’. For our GitHub repository, it’s https://github.com/TestingDiaries/maven-jmeter.git.
  • Under ‘Branches to build’ section–>Branch Specifier, add branch name for which you want to build.

JMeter with Jenkins setup
  • JMeter with Jenkins setup
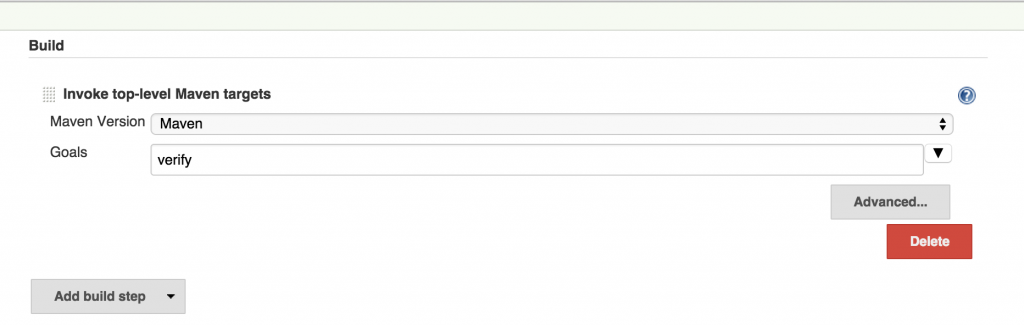
  • Add a Maven build step with ‘verify’ as Goal.Maven Build Step
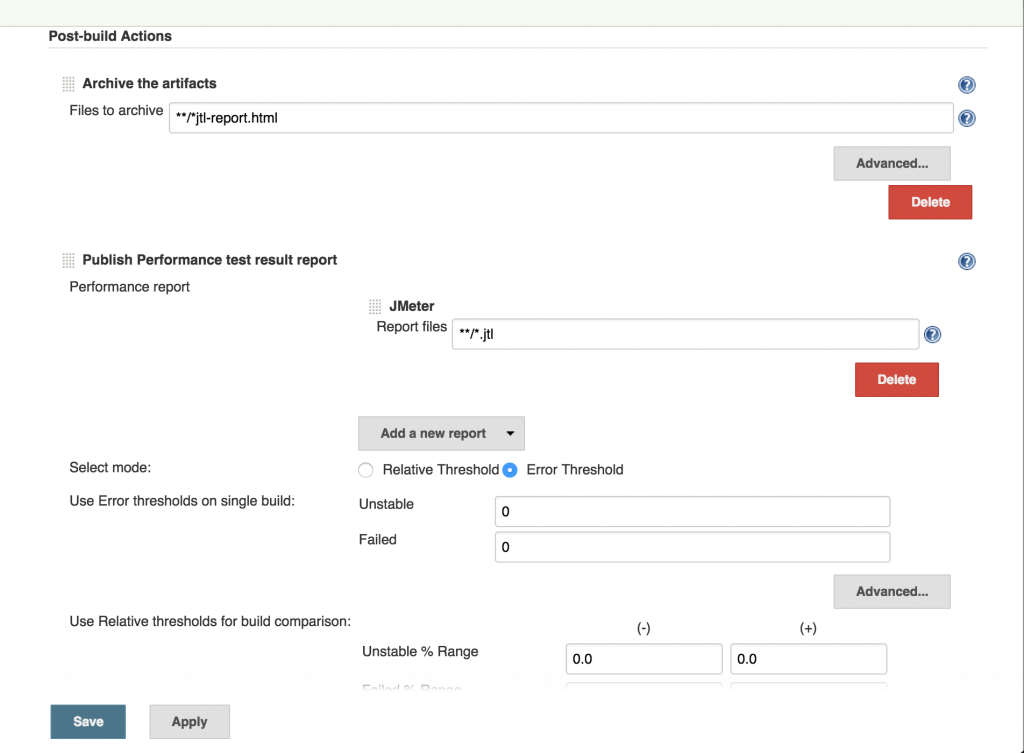
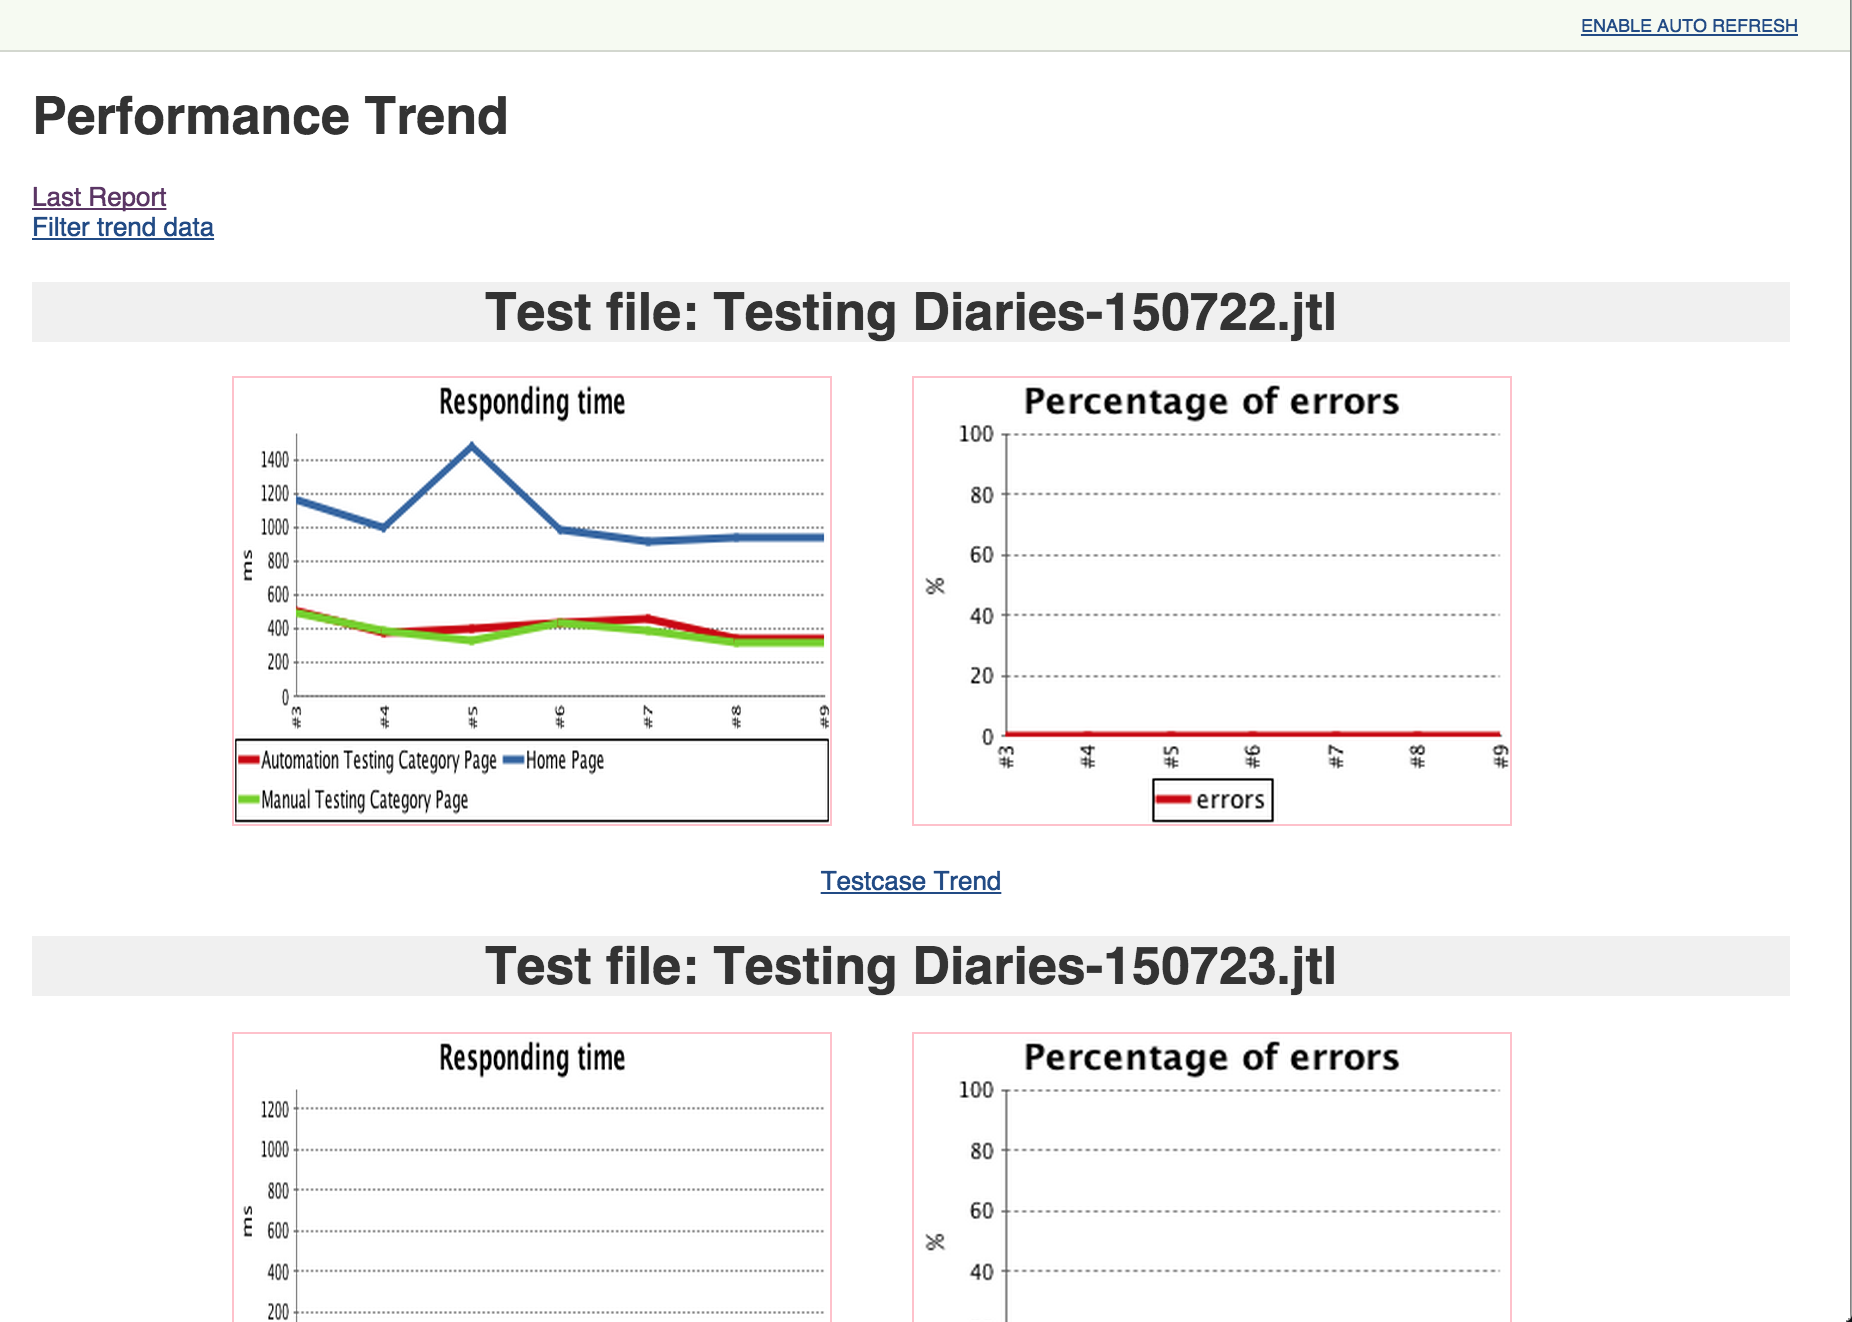
  • Now, select ‘Add post-build action’–>’Publish Performance test result report’ option.
  • Under ‘Performance report’ drop down box, select ‘JMeter’ option.
  • Provide ‘**/*.jtl’ as ‘Report files’. This sets up all the .jtl files as reports.
  • Check ‘Archive the artifacts’ check box and provide ‘**/*jtl-report.html’ value as ‘Files to archive’.

Jenkins Performance Settings
  • Jenkins Performance Settings
  • Click Save.
  • Record your JMeter script and save it in your Maven project’s src/test/jmeter directory.
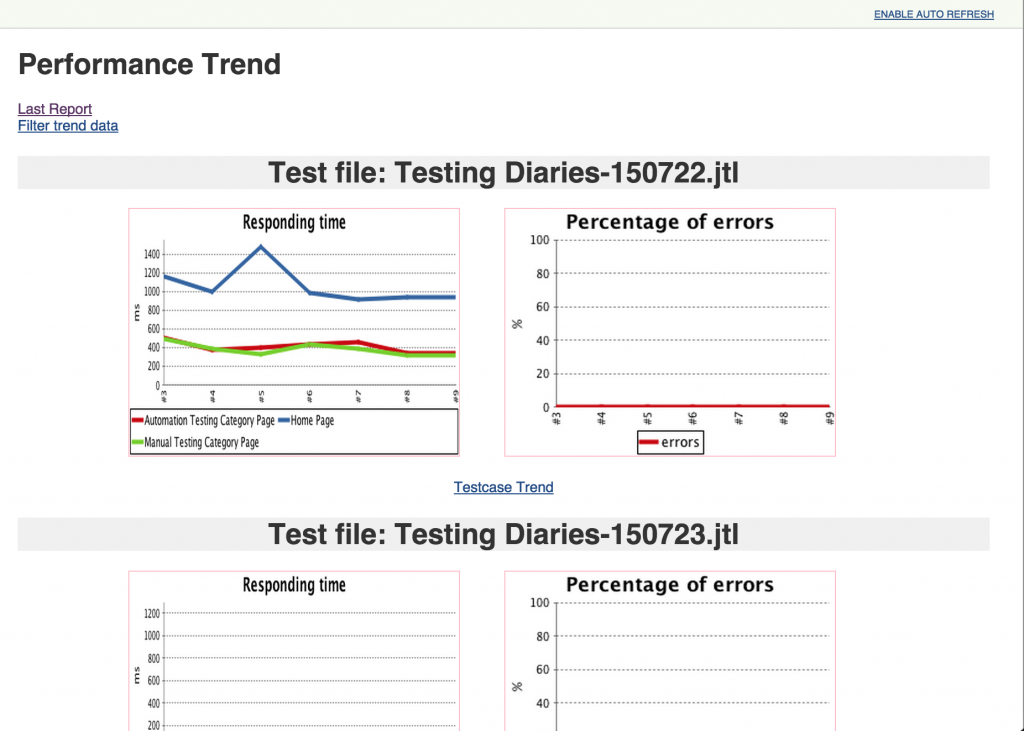
  • Click Build Now. Once the build is run, you can see various performance reports in Jenkins.

Performance Report
  • Performance Report

Comments

Popular posts from this blog

SSO with SAML login scenario in JMeter

SAML(Security Assertion Markup Language) is increasingly being used to perform single sign-on(SSO) operations. As WikiPedia puts it, SAML is an XML-based open standard data format for exchanging authentication and authorization data between parties, in particular, between an identity provider and a service provider. With the rise in use of SAML in web applications, we may need to handle this in JMeter. This step-by-step tutorial shows SAML JMeter scenario to perform login operation. First request from JMeter is a GET request to fetch Login page. We need to fetch two values ‘SAMLRequest’ and ‘RelayState’ from the Login page response data. We can do this by using  Regular Expression Extractor . These two values need to be sent in POST request to service provider. Refer below image to see how to do this. We will get an HTML login page as a response to the request sent in 1st step. We need to fetch values of some hidden elements to pass it in the next request. We can do this b

Reading data from text file in SoapUI using groovy script

How to read data from text file in SoapUI. SoapUI Pro has some advance feature which is not in SaopUI as data fetching from external sources so in SoapUI we use Groovy script for that. Following are the peace of groovy script code for reading data from text file. 1. Reading all data from text file. //reading all txt file at once File file = new File("E://TestData.txt") fileContent = file.getText()                  log.info fileContent 2. Reading data line by line from text file. //reading text line by line File file1 = new File(" E://TestData.txt ") List textLine = file1.readLines() log.info textLine 3. Reading data randomly of any line from text file. //reading text randon line number File file2 = new File(" E://TestData.txt ") List textLine2 = file2.readLines() rowIndex  =  Math.abs(new Random().nextInt() % 4 + 1) log.info textLine2[rowIndex]

VBScript Code - Function to convert CSV file into excel and viceversa in QTP using VBScript

We at times are required to convert excel files into csv to read as flat files and sometime require to convert a csv file into excel file to use excel features on the data.   Below function shows how to convert an csv file into excel file and vice versa. We can also convert to other formats based on constants Here constant value 23 is used to create a csv file and constant -4143 to save a file as xls file. Once the destination file is created, we can delete the source file as shown below.  In case of any issue in understanding the code, please add in comment section Call func_ConversionCSVExcel("E:\Test.csv", "E:\Test_converted.xls", "csvtoexcel") Public Function func_ConversionCSVExcel(strSrcFile, strDestFile, Conversion) on error resume next Set objExcel = CreateObject("Excel.application") set objExcelBook = objExcel.Workbooks.Open(strSrcFile) objExcel.application.visible=false objExcel.application.displayalerts=